
DIY Roomba Virtual Wall

Recently, my Roomba virtual wall broke. Not sure what happened. I did a battery change, and the darn thing will not power up after the new batteries were inserted.

Anyway, while looking online for a new virtual wall to buy, I came across info on people making their own virtual walls. Here is a links dump:

  1. https://petezah.com/category/development/roomba/
  2. https://www.thingiverse.com/thing:3104027
  3. http://blog.batmule.dk/posts/2019/Roomba_Virtual_Wall_part1/
  4. http://www.robotreviews.com/chat/viewtopic.php?p=65658&mobile=on
  5. https://misc.ws/2014/02/27/diy-virtual-wall-for-roomba/
  6. https://misc.ws/2014/08/09/diy-virtual-wall-for-roomba-part-two/
  7. http://www.enide.net/webcms/index.php?page=virtual-wall-for-roomba
  8. http://eka.tomeczko.pl/index.php/diy-roomba-virtual-wall
  9. http://gregthielen.me/blogstuff/2017/06/27/roomba-virtual-wall/
  10. https://github.com/MKme/Roomba
  11. http://forkthings.com/2016/11/25/diy-an-irobot-roomba-virtual-wall/
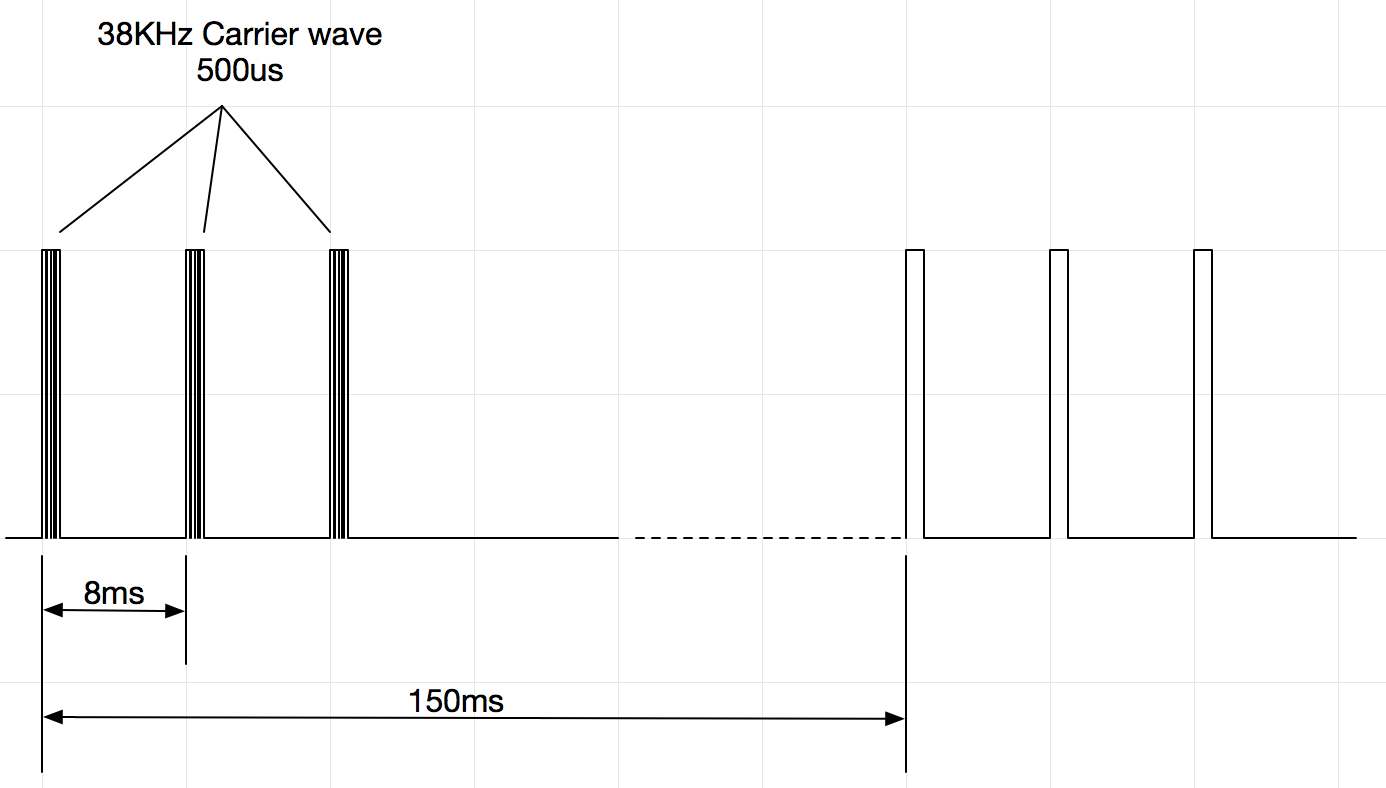
Turns out it is extremely easy to produce the IR signal emitted by the virtual wall. It's basically 0.5ms mark, 7.5ms space, 3 times, followed by 132ms of rest (based on the info given here), over a 38KHz modulation frequency.

I decided to test the idea using a simple ATtiny85-based circuit on the breadboard:

 
The test program is as follows:

#include <Arduino.h>
#include <tiny_IRremote.h>

IRsend irsend;

void setup() {
  irsend.enableIROut(38);
}

void loop() {
  for (int i=0; i<3; i++) {
      irsend.mark(500);
      irsend.space(7500);
    }
    delay(132);
}

My initial attempt using the IRRemote library found in Arduino's Library Manager didn't work, though ATtiny85 is supposed to be supported.

Being the lazy bum that I am, instead of trying to debug the library, I simply googled around and found another IR remote library called tiny_IRremote. I downloaded the library and changed the include file, and to my amazement, the test circuit worked on first try!

The IR LED that I was using on the breadboard was the one salvaged from the broken virtual wall. I also tested another IR LED that I removed from an old TV remote, as well as a IR LED that I found in the original Arduino kit purchased many years back. They all worked without a problem (at least with the two 500-series Roomba in my possession).

Now that the proof-of-concept works, I am going to build a replacement Roomba virtual wall with the ATtiny85.

Comments

  1. Missing the declaration of irsend in this little example

    ReplyDelete
    Replies
    1. Find in tiny_IRremote: https://gist.github.com/SeeJayDee/caa9b5cc29246df44e45b8e7d1b1cdc5

      Delete
    2. Thanks for your answer. I don't think you got my point; I'm aware that I've to use the lib from this Gist; but I just pointed out that in this POF code the declaration of irsend object is missing:

      #include
      IRsend irsend; // This was missing

      (#include is missing too by the way)

      Thanks for this project !

      Delete
    3. okaayyy ... for some reasons some parts are deleted on comments ... So again, without angle brackets 🤥

      #include tiny_IRremote.h // imagine angle brackets ...
      IRsend irsend; // <-- This was missing

      (#include Arduino.h is missing too by the way; again imagine angle brackets)

      Delete
    4. Ah, I see! I have fixed up the code. Thanks for pointing out the omissions!

      Delete

Post a Comment

Popular posts from this blog

Hacking an analog clock to sync with NTP - Part 5

This is how it looks after I have put everything together. The Arduino sketch is available here . The 2 jumper wires soldered to the clock mechanism are connected to pins D0 and D1 on the ESP-12 (in any order). When the device first boots up, it presents an access point which can be connected to via the PC or smartphone. Once connected, the captive portal redirects the web browser to the configuration page:     A custom field has been added to the WiFi configuration page to enter the current clock time in HHMMSS format. Try to set the clock time to as close to the current time as possible using the radial dial at the back of the clock so the clock will have less work to do catching up. In the config page, the HTML5 Geolocation API is also used to obtain your current location (so if your web browser asks if you would like to share your location, answer "yes"). This is then passed to the Google Time Zone API to obtain the time and DST offset of your time z...

Samba Server on Android Media Player

I recently bought an Android-based media player: the Minix Neo X5 . It came with the original firmware , which had issues playing the MTS video files that my digital camera produces, so I promptly upgrade to the latest ver 011 of the firmware. That solved the MTS playback issue, but the firmware itself was not very stable and hang quite frequently. So I promptly installed Clockmod Recovery , followed by the CWM version of Finless V1.2b . Now everything is fast and stable! Next, I needed an SMB server on the media player so that I can manage its content from other PCs in the house. Surprisingly this turned out to be harder than I thought given the hackish nature of Android. SambaDroid was quite easy to install and work with. Unfortunately, it does not support files > 2GB in size. This is quite a major limitation given than many media files these days are > 2GB in size. Samba Server turned out to be a dud. Despite having root access, I couldn't set it up so that it is a...

Adding "Stereo Mixer" to Windows 7 with Conexant sound card

This procedure worked for my laptop (Thinkpad E530) with a Conexant 20671 sound card, but I suspect it will work for other sound cards in the Conexant family. I was playing with CamStudio to do a video capture of a Flash-based cartoon so that I can put it on the WDTV media player and play it on the big screen in the living room for my kids. The video capture worked brilliantly, but to do a sound capture, I needed to do some hacking. Apparently, there was this recording device called "Stereo Mixer" that was pretty standard in the Windows XP days. This allowed you to capture whatever was played to the speaker in all its digital glory. Then under pressure from various organizations on the dark side of the force, Microsoft and soundcard makers starting disabling this wonderful feature from Windows Vista onwards. So after much Googling around, I found out that for most sound cards, the hardware feature is still there, just not enabled on the software side. Unfortunately, to...