PC Logger: AutoIt3 script for PC activity monitoring

Due to COVID-19, the kids had to do online learning for a couple of months. Unfortunately, they were constantly tempted to play games or watch YouTube during class time. Sometimes they became so immersed that they missed lessons, or forget to complete assigned tasks.

I tried various solutions, such as parental control software, or lock down the router. None of them worked for me. There were just too many things to configure. Furthermore, some potential avenues for distraction (eg. YouTube) might sometimes be necessary for schoolwork (eg. YouTube being used for information or research by the teacher).

The solution I eventually settled upon turned out to be quite simple. I hacked together an AutoIt script that logs details about the active window (title and executable) to a Google form periodically. By looking at the logs from time-to-time, it gives me a pretty good picture of what they have been doing on their computers, and have a chat with them when things get out-of-hand.

Github repository for the script

To use the script, first open up this Google Form. Then click on the dot-menu at the top-right hand corner and select "Make a copy...". Give it any name you want (eg. "PC Logger") and click "Done". This will save the new copy to your Google Drive, and open the form in a new browser tab.

Now, click "Send" at the top-right corner, then click on the "Link" icon:

Click "Copy" to copy the URL and open it up in another browser tab. This is the actual form that allows the submission of new information, and we are going to obtain some details from it so that the AutoIt script can use them to submit new information.

You should also have the AutoIt script pclogger.au3 opened in a text editor (yes, even Notepad).

View the source code of the form (usually right-click on webpage and select "View page source"). Then look for (Ctrl-F):

  •  "<form action=". Then copy everything within the double-quotes (should be in the form "https://docs.google.com/forms/u/.../formResponse" and paste it into the script, assigned to $FormResponseUrl.
  • "data-params=", followed by "&quot;Username&quot;,null,0,[[<number>". Copy the "<number>" into the script, assigned to $FormUsername.
  • "data-params=", followed by "&quot;Executable&quot;,null,0,[[<number>". Copy the "<number>" into the script, assigned to $FormExecutable.

  • "data-params=", followed by "&quot;Title&quot;,null,0,[[<number>". Copy the "<number>" into the script, assigned to $FormWinTitle.
After all is done, the top part of pclogger.au3 should look like this:

; Find the following information from your own Google Form
; Look for "<form action="
Local $FormResponseUrl = "https://docs.google.com/forms/u/0/d/e/.../formResponse"
; Look for "data-params=" followed by &quot;Username&quot;,null,0,[[<number>
Local $FormUsername = <number>
; Look for "data-params=" followed by &quot;Executable&quot;,null,0,[[<number>
Local $FormExecutable = <number>
; Look for "data-params=" followed by &quot;Title&quot;,null,0,[[<number>
Local $FormWinTitle = <number>

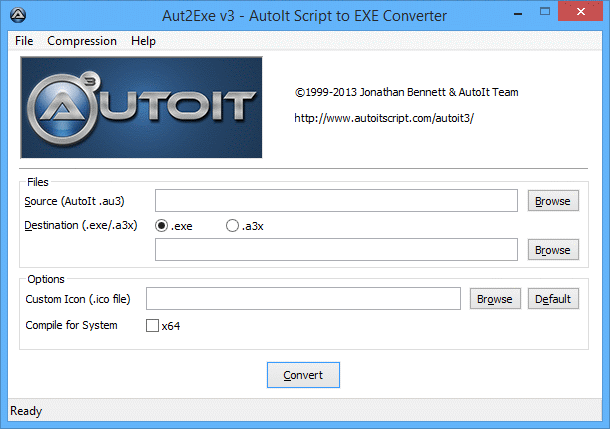
Now if you do not already have AutoIt, download and install it from their website. Then from the Start Menu, select "Compile Script to .exe":


This lets you convert pclogger.au3 to an EXE. You can give the EXE any name that you want (doesn't have to be pclogger.exe, that would be boring). If you want to be fancy about it, you can even give the EXE a custom icon (I just use the default). Make sure the "x64" checkbox is checked (who runs 32-bit Windows these days?).

Now run the EXE. No icon will appear in the taskbar, because "#NoTrayIcon" was specified in the script. So the only way to kill it is via Task Manager (Ctrl-Alt-ESC). But as long as the EXE is running, it will log information about the active window to your Google Form at a 1-minute interval.


However, I find the most useful way to visualize the logged information is by creating a linked Google Spreadsheet. Do it by clicking on the green Sheet button on the top-right:


You have the option of either creating a new Sheet, or using an existing Sheet. Once that is done, the Google Sheet is opened, and you get the form information nicely tabulated:


This Google Sheet is hot-linked to the form, so any new submissions will automatically be reflected. With all the data in a spreadsheet, you can sort, search and tabulate to your heart's content.

Once you are happy the EXE is working correctly, do the following to make it auto start. On the target machine, press <Win+R> and type "shell:common startup". This will open up the auto-start folder. Copy the EXE into this folder. Then it will be automatically executed when Windows restarts.

Besides using the script to monitor the PC activity of kids, this script could potentially be used for employee monitoring as well. However, whichever the case, please make sure the party being monitored knows about this. Spying or monitoring in stealth is never acceptable!


Comments

Popular posts from this blog

Update: Line adapter for Ozito Blade Trimmer

Update (Dec 2021): If you access to a 3D printer, I would now recommend this solution , which makes it super easy to replace the trimmer line. I have been using it for a few months now with zero issue.

Cooling mod for the X96 Air

I realized after my Ugoos box died that overheating is a big problem with cheap Android TV boxes. A teardown of the Ugoos box shows that it does not have any heatsink or fan at all!  The X96 Air does have a heatsink, but the heatsink is located at the bottom of the casing with no ventilation. In this default configuration, with the ambient room temperature at 25c and playing a 1080p video, I was seeing the CPU temperature at 67c. I drilled a couple of holes at the bottom of the casing. The CPU temperature fell to 59c with the box raised about 2cm with plastic blocks. I retrieved an old 5V laptop fan: Then cut and strip away a spare USB cable: Solder the red and black wires on the fan and the cable: Secure the fan to the bottom of the casing with double-sided tape, then plug the fan into the box's USB connector. Here's a view of the box with some 3D-printed risers installed at the bottom to give the mounted fan sufficient clearance: The CPU now runs at 43c, a huge drop from the ...

Installing and customizing CoreELEC in X96 Air

I previously installed CoreELEC on another TV Box ( Ugoos X3 Pro ), which unfortunately died after only 9 months during the summer (due to the unit overheating, which I learned is a common problem for cheap Android TV boxes). So this time I purchased a X96 Air  (4GB/32Gb) and had to do the whole thing again. So this is a note-to-self in case I ever have to install CoreELEC again on some other device. Installation of CoreELEC is simple enough by following this guide . Basically, it involves downloading and writing the firmware to a microSD card using usbimager . Then insert the microSD card, reset the unit and hold the reset until the logo appears. The unit will then proceed to boot into CoreELEC. First thing is to connect to WiFi, then enable SSH. This allows me to login via ssh and execute: ceemmc -x from the terminal. This writes CoreELEC to the built-in eMMC storage, after which I am able to remove the microSD card and reboot the unit into CoreELEC via the built-in sto...